
How
deep are the rear firewall mounted sub-boxes??
People
have been asking this quite often, and the photos on my website obviously don't
show
clearly this information. I had my seats out to shampoo the carpet and took new
photos as below.
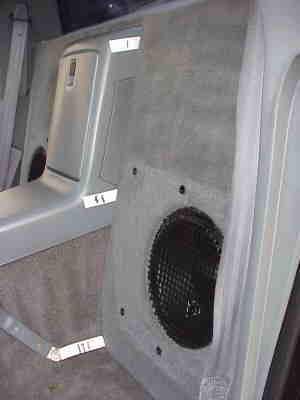
You can see the placement of the sub boxes relative to the center console and
side panel.
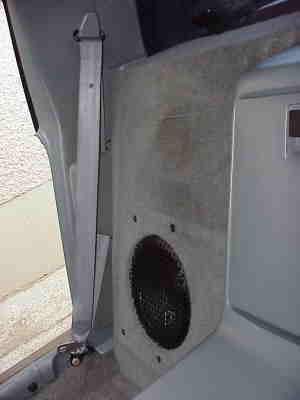
At
location I & II it is 3 inches from the FRONT of the console to the front of
the sub-box.
At
location III it is 4 1/2 inches from the bolt center to the front of the
sub-box. In the
second
photo you can see where the front of the sub box is relative to the seat belts
on
the
side panels. These are boxes have the OZ Audio 250L subs. These are only 4 3/4
inches
deep,
and have excellent specs (high efficiency etc.)
http://www.sounddomain.com/shopping/product_details.cgi?sku=OZA250L&sidebar_
![]()
How deep your subwoofers are will
determine how deep the boxes will need to be, regardless
of whether you cut into the
firewall or not. I've done some more research and have found that
some shallow depth subs are now
made. These are high-end high Sound Quality subs. Be warned,
you won't find these on sale at
WalMart!!
Illusion Audio speakers and subwoofers - subs as shallow as 2.9"
http://www.illusionaudio.com/illusion/Driversx.html
Illusion Audio's trademark is placing the motor assembly (magnet & voice
coil) in FRONT of the
speaker cone instead of behind it
on mid-bass drivers and subwoofers. This allows for increased
flexibility and the option for
large diameter speakers in shallow depth locations.
Phase Linear S1 10" subs have shallow mounting depth - as low as 3"
(80mm)
http://www.phase-linear.com/html/aliante_10si_data.html
Morel has very shallow 6" and 8" woofers at 2.5"
http://www.morelusa.com/prices/ren.html
These come highly recommended by the guys at the www.sounddomain.com
forums...
If you use a monster 15" long throw sub-woofer with a
basket 8 inches deep, your box
will have to be significantly deeper.
There's quite a bit of work involved in putting subs behind
the Fiero seats, but it’s fairly
straighforward and not overly difficult to do.
If you decide to install subs this way, here's a better
breakdown of the work involved.
Tools & supplies required:
- electric drill and bits
- electric hand jigsaw - wood and metal blades
- table saw or electric hand saw
- hand saw
- tape measure
- 3/4" MDF panel (Medium Density Fiberboard)
- wood screws, metal screws, wood glue, silicone
- cardboard from appliance box is useful
The interior of the Fiero is not "square", so I can't send exact sizes
for anything. You have to
build the boxes into the car while the interior in the rear
section is removed. Removing the
seats gives more room. If needed as a daily driver, you may
have to remove/reinstall driver's
seat several times as you work.
Once the interior is out, what needs to be done becomes obvious if you follow
the information at my site.
The
gas filler pipe runs through the area on the driver's side - be careful!!
To cut out the
firewall, drill a small hole about 12 inches up from the
floor. Insert a wire coat hanger to "feel out"
how large an area you can cut out. Use an electric hand
jigsaw. (NO
TORCHES!!)
It's better to
start small - you can always cut out more.
The "well" is in an 8" or 10" inch channel supporting the
firewall. Each end needs to be sealed. Cut
some MDF to fit and silicone into place. Some people are
using fibreglass to to this - probably easier.
You need to seal this - otherwise all your bass will be
"outside". There is limited space for speaker
magnets. Buy high efficiency speakers with small magnets. I
recommend OZ Audio 10" 250L subs
because of their excellent specs.
http://www.sounddomain.com/shopping/product_details.cgi?sku=OZA250L&sidebar_
"Try out" how/where speakers will fit and take measurements. You can
use cardboard to help "size"
the box you will need to build. This can then serve as a
template to help build the MDF enclosure.
Build the "frames" first - make sure they fit properly. It'll take
time to shape and trim them to fit snugly
against the firewall. THIS
IS THE MOST TIME CONSUMING BUT MOST IMPORTANT PART!!!
Attach to firewall with sheet metal screws. Don't forget to get your speaker
wire routed into the sub
box at this time. Seal firewall/frame joint with silicone
to make sub box airtight. This is where proper
fitting helps installing and sealing.
Make your front panels. Also determine what you will do across the top below the
window to finish.
Keep in mind you need to install speakers from the front -
so you can remove them for replacement.
Determine how you want to mount speaker:
- surface mount with grill
- sunken with custom grill panel
Check for clearance/fit of panels to center console, wall panels, etc. Attach
speakers to panels and
check again, making sure everything fits/clears. Make
adjustments as necessary so everything fits.
Remove speakers (to prevent accidentally damaging them).
Attach front panels to frames with glue/screws. Install speakers again and test
run - check for rattles,
etc. and fix if any. Remove speakers (to prevent
accidentally damaging them).
Cover the sub boxes with covering of your choice. Unbacked carpeting is best and
easiest to work with.
It can be cut easily, stretched around corners and will
hide small imperfections. It can be bought from
car upholstery shops and Car Audio stores in a variety of
colors. Use a good quality spray adhesive.
Cut and reinstall carpeting - leave enough to tuck under/around edges sub boxes.
Install side panels and
center console. Install speakers and grills. Reinstall
seats. You're done!!!
Hope this helps,
Good luck.